Follow these three steps to create a map layer from a plain image or raster data. Each step is explained in detail below (click on the step item to skip to its details):
Copy the image file to where Bit Map can access it
This step can be skipped if the image is already georeferenced – eg, GeoTIFF
Georeferencing is the process of configuring how each pixel in the image relates to coordinates in a particular spatial reference system and vice versa; without georeferencing, there would be no way for Bit Map to know where in the world a map image fits, or where in the map image your current location or other features fit
This step is automatically triggered by the next step if the image is not already georeferenced; therefore it is not usually necessary to explicitly invoke this step unless you wish to change the georeferencing of an image that is already georeferenced
Images are split into a grid of tiles (in fact into several grids of tiles for different zoom levels) to avoid the memory-intensive and slow process of attempting to load an entire image into memory when displaying it as a map layer.
Import Image to Bit Map
The image will need to be imported into Bit Map’s own ‘Documents’ repository where it has full access to the image file. Follow the steps below to import the image.
NB: The ‘Files’ app (from Apple) will be required. If you do not already have this app, or if you’ve deleted it, you will need to download the ‘Files’ app from the App Store.
- Copy (or move) the image into the ‘Files’ app on your device.
- For most users, the easiest way to do this would be to copy the image file to the ‘iCloud’ folder on your device (or on your computer after which it should sync to your device).
- In the ‘Files’ app, tap on the image file
- Tap the ‘…’ (menu) button at the top-right and choose the ‘Select’ command
- Tap each of the required file(s) to select it/them (some images includes multiple files for the one image, eg, a .tiff plus a .tfw file)
- Tap the folder button in the bottom toolbar
- Use the Back button (top-left) to navigate back out of iCloud Drive until you can see the ‘On My iPhone’ (or ‘On My iPad’) option
- Tap the ‘On My iPhone’ or ‘On My iPad’ button
- Tap the ‘Bit Map’ folder
- Tap the ‘Copy’ button at top-right
The image will now be listed in Bit Map’s Offline Layers Directory
![]()
However, it is not yet ready to be used as a layer on the map. Refer to the Create a Tile Grid Layer section, below, to convert the raster image into a native Bit Map tile grid layer.
Georeference Image
NB: This step is usually not required to be invoked explicitly, as the ‘Create a Tile Grid Layer ‘ step (below) will automatically trigger this step if the image is not already georeferenced.
Therefore you can usually skip explicitly invoking this step and jump straight to the Create Tile Grid Layer step (which will automatically include this step, if necessary).
However, you can invoke georeferencing explicitly if you wish to georeference the image without creating a map layer or if you wish to replace the georeferencing configuration. To commence georeferencing without creating a layer:
- From the Main Map View, tap the Offline Layers Directory button to display the Offline Layers Directory
- In the Offline Layers Directory, tap the image file name
- Bit Map will display an Image View including:
- Image
- Type of georeferencing used for the image (if any)
- Spatial reference system used for the image (if any)
- Bit Map will display an Image View including:
- Tap ‘Georeference’, at the bottom-left of the Image View to commence georeferencing the image
To continue georeferencing, either after explicitly invoking this step (as above), or as part of creating a tile grid layer (as below):
- Select ONE of the following four methods for georeferencing (in order from simpler/less-accurate, to more-complex/more-accurate):
- Match Map
- Simply pan zoom the map (including all the layers from the main map view) until its features line up with the features of the image (the image will be georeferenced for the spatial reference system currently being used by the map, even if this is not the original spatial reference system of the image)
- Extent (min/max) Coordinates
- Enter the coordinates of the bottom-left and top-right corners of the image (and specify which spatial reference system the coordinates are for)
- Control Points by Coordinates
- Enter the coordinates of at least two arbitrary control points on the image (and specify which spatial reference system the coordinates are for)
- Control Points by Map Points
- Place at least two arbitrary control points on the image and corresponding control points on the map (the image will be georeferenced for the spatial reference system currently being used by the map, even if this is not the original spatial reference system of the image)
- Match Map
- Refer to the relevant section below to continue with on with the selected georeferencing method
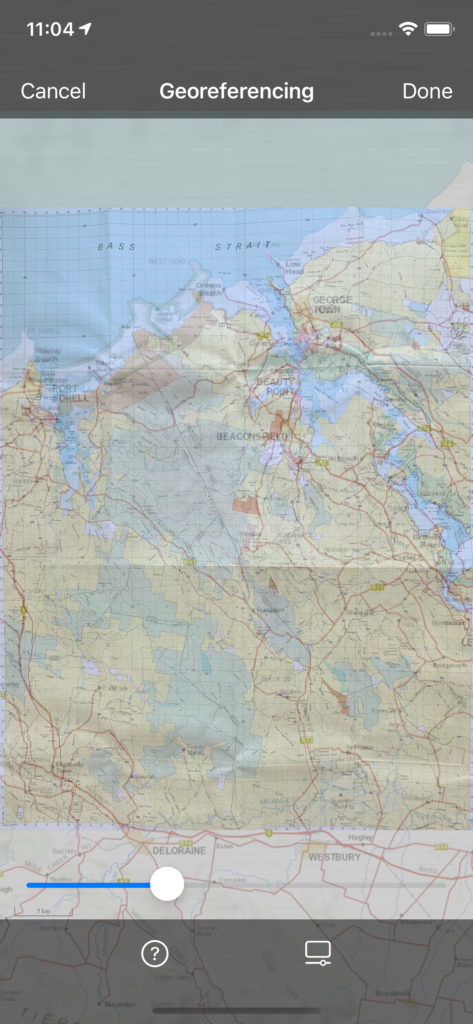 Georeference Option: Match Map
This is the easiest georeferencing method. However, it can be less accurate, if the image was generated using a different spatial reference system to the current map or if the image is warped (eg from folds in paper).
The resulting layer will be assigned the same spatial reference system as the current map, even if this is not the spatial reference system that was used to generate the image.
At any time during this process:
- Drag the slider to change how transparent/opaque the image and map appear as they overlay each other
Georeference as follows:
- Use two fingers to drag and/or pan the map until its features match the corresponding features on the image as closely as possible over as much of the image area as possible.
- Note that if the image is not in the same spatial reference system as the map, or is warped by folding (paper), etc, then an exact match may not be possible
- Tap ‘Done’ at top-right
 Georeference Option: Extent Coordinates
This georeferencing method is easy if the coordinates of the map extent (corners) are known. However, it can be less accurate, if the image was generated using a different spatial reference system to the current map or if the image is warped (eg from folds in paper).
- From the list of Spatial Reference Systems that appears, select the one used by the image (or the one for which you know the maximum/minimum coordinates of the image)
- Use the search field to filter the list of SRSs
- Enter the four coordinates:
- Minimum X (left)
- Minimum Y (bottom)
- Maximum X (right)
- Maximum Y (top)
- Tap ‘OK’
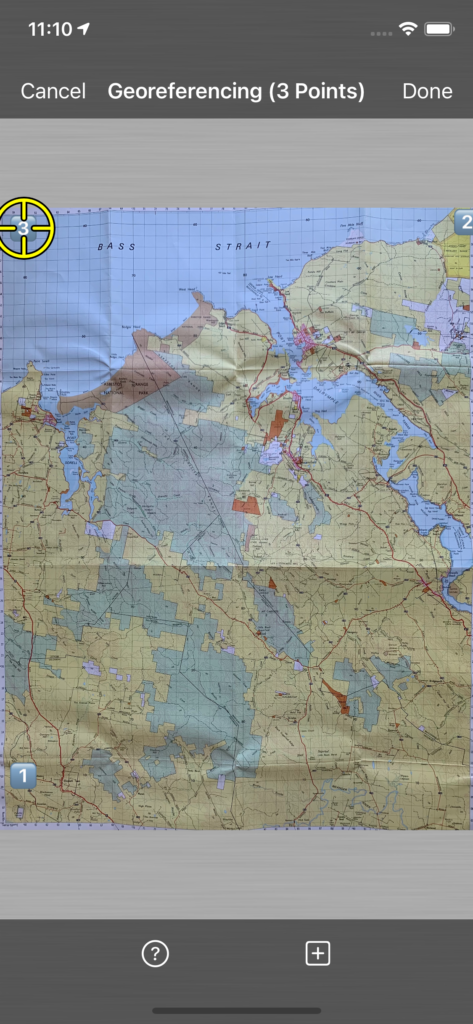
Georeference Option: Control Points by Coordinates
This method of georeferencing requires a little more effort, but should result in a more accurate result. It requires knowledge of the coordinates of a few features on the map (map grid lines can be useful for this, if they are present).
At any time during this process:
- Use TWO fingers to pan/zoom the image
- Use ONE finger to move the target
Georeference as follows:
- From the list of Spatial Reference Systems that appears, select the one used by the image (or the one for which you know the maximum/minimum coordinates of the image)
- Use the search field to filter the list of SRSs
- Place the target (using ONE finger) at a point on the image where the coordinates are known
- Zoom in (and pan) the image to be more accurate (TWO fingers)
- Intersections of grid lines are excellent candidates for this, if the image includes them
- Tap the ‘+’ item (bottom) to place a control point at the target location
- Enter the coordinates for this control point
- Tap ‘OK’
- Repeat for more control points
- Tap ‘Done’
NB: At least TWO control points are required. At least THREE are recommended for accurate georeferencing. The further apart the control points are in both X and Y axes, the more accurate the georeferencing will be.

Georeference Option: Control Points by Map Points
This georeferencing method takes some work to configure, but should result in a more accurate result. It requires being able to match a few features on the image with their corresponding features on the map.
The resulting layer will be assigned the same spatial reference system as the current map, even if this is not the spatial reference system that was used to generate the image.
At any time during this process:
- Use TWO fingers to pan/zoom the image OR the map (depending on which is selected)
- Use ONE finger to move the target
- Select the ‘Move Map’ or ‘Move Image’ item (bottom) to change which of the map/image is panned/zoomed when using two fingers
- Drag the slider to change how transparent/opaque the image and map appear as they overlay each other
Georeference as follows:
- Place the target (using ONE finger) at a point on the IMAGE where the corresponding map point can be easily found
- Zoom in (and pan) the image to be more accurate (TWO fingers, ‘Move Image’ selected at bottom)
- Tap the ‘+’ item (bottom) to place a control point at the target location on the image
- The ‘Move Map’ item will automatically become selected
- The ‘+’ item will become highlighted to indicate that you now need to define the corresponding point on the map
- Place the target (using ONE finger) at the point on the MAP that corresponds to the point that has just been placed on the image
- Zoom in (and pan) the map to be more accurate (TWO fingers, ‘Move Map’ selected at bottom)
- Tap the ‘+’ item (bottom) to place a control point at the target location on the map
- The ‘Move Image’ item will automatically become selected
- The ‘+’ item will return to its normal state to indicate that you can now place another point on the image
- Repeat for more control points
- Tap ‘Done’
NB: At least TWO control points are required. At least THREE are recommended for accurate georeferencing. The further apart the control points are in both X and Y axes, the more accurate the georeferencing will be.
Create Tile Grid Layer From Georeferenced Image
- If not already showing the image in Bit Map’s Image View, navigate to the Image View:
- From the Main Map View, tap the Offline Layers Directory button to display the Offline Layers Directory
- In the Offline Layers Directory, tap the image file name
- Bit Map will display an Image View including:
- Image
- Type of georeferencing used for the image (if any)
- Spatial reference system used for the image (if any)
- Bit Map will display an Image View including:
- From the Main Map View, tap the Offline Layers Directory button to display the Offline Layers Directory
- Tap ‘Create Layer’ at the bottom-right of the Image View to commence creating a Tile Grid Layer from the image
- If the image is not already georeferenced, then the georeferencing process will begin
- Refer to the ‘Georeference Image’ section, above, to georeference the image
- The image will automatically be reprojected (warped) if necessary
- The image will be split into a grid of tiles for the maximum zoom level (ie, it’s native size) and then again for each zoom level lower until only one tile is required to contain the entire (zoomed out) image
- If the image is not already georeferenced, then the georeferencing process will begin
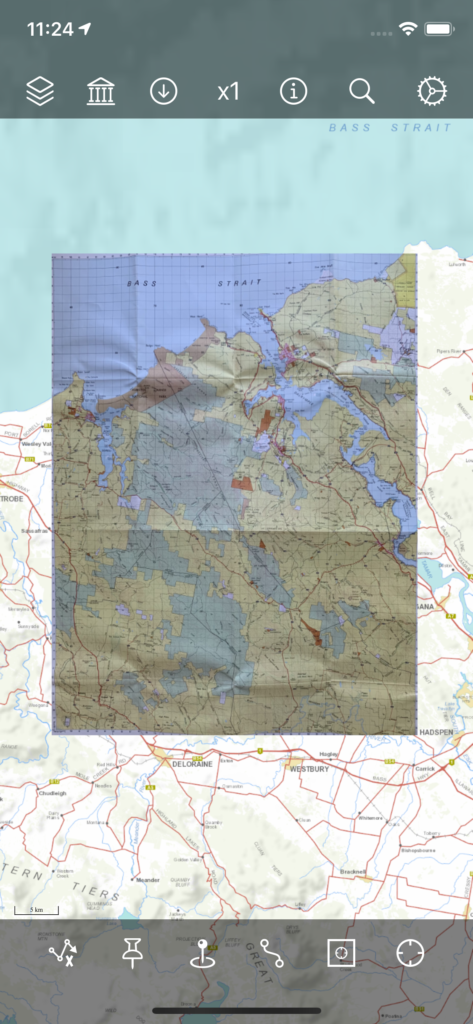
The layer will now be available in the Offline Layers Directory as a separate item to the original image file. If an intermediary file was required (eg, if the image had to be reprojected before being tiled), then a third ‘.tiff’ (GeoTIFF) item will also be available. This intermediary and the original can now be deleted to save space (and to make the layers directory easier to browse) if you wish.
To add the layer to the map:
- Tap the ‘Directory’ (back) button to return to the Offline Layers Directory view
- From the Offline Layers Directory view, tap on the Add to Map button next to the Tile Grid layer item to add that layer to the map

- The layer will be added below any other map layers (but above any base maps). Layer ordering can be modified in the Map Layers view